Creating Subgroups In Reaper and Pro Tools

I just watched a video tutorial showing how to create instrument subgroups in Pro Tools. I was very pleased to see (in a petty kind of way) how much easier it is to do the same thing in Reaper;). But first, a bit of an explanation.
What is an instrument subgroup?
If you have 10 or 11 tracks of drums (one for the kick, one for the snare, one for the hat, and so on) in your song mix, it might be really handy once you get the relative mix of the drums just right (the volumes of the kick, snare, hat, etc. working well with each other) to control the volume of ALL the drums with just one volume slider when working to get the volume of the drums to work well with the rest of the tracks (vocals, guitar, bass, etc.).
Well that’s exactly what a subgroup does. You set it up so that all the drums feed into a single new stereo track that you can call “Drums,” and then when you move any control on that new Drum track, it will affect ALL the drums. And it isn’t just the volume you can control this way.
You can apply effects like reverb or compression or EQ to the Drum subgroup track, and those effects will be applied to all the drums.
So now, not only can you control all the drums with just the controls on a single track, but you can save load on your computer’s CPU, since the effect is loaded only once (for the Drums subgroup track), rather than 11 times – once fore each individual drum track.
And an added benefit is that you can make the drums sound more cohesive by putting them all through the same effect with the same settings.
Creating a subgroup in Reaper

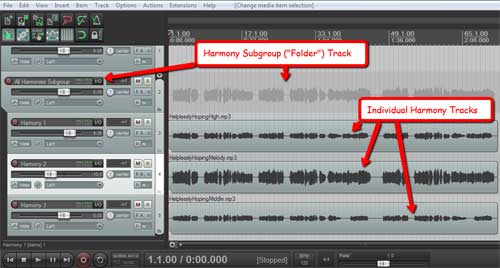
Let’s start with 3 harmony vocal tracks that you’d like to control with just a single subgroup track.
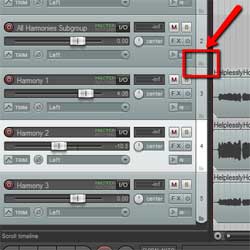
Just create a new track above the 3 harmony tracks like in the picture on the top left. In the bottom right corner of the new, blank soon-to-be subgroup track (called a “Folder” track in Reaper) you’ll see a little folder-shaped icon. See Figure 2.
All you have to do is click on that little folder button and it’s done! Every track underneath it gets indented to indicate that they are now inside that folder track, so to speak, and you can now control the volume and everything else – mute, solo, effects, etc.) of all the harmony tracks with just that one new subgroup/folder track.
One thing to be aware of here is that if you have other tracks below/after the harmony tracks that are not harmonies, tracks you don’t want in the folder, then you’ll need to click the folder icon (bottom left of the track control panel) for the last harmony track to tell Reaper that it’s the last track you want in the folder.
This is because as I mentioned earlier, clicking the folder icon indents (incorporates into the folder) all the tracks below/after it be default.
Creating a subgroup in Pro Tools
In Pro Tools you still need to create a new track, and tell Pro Tools . Then you have to tell Pro Tools to use “aux (auxiliary) input.”
Then you have to select an input for the new track, a “bus” input. Then you have to change the outputs of all the drum tracks (can do this at once by selecting them all) to the bus you used as the input for the subgroup track.
You can see all this in the video below from PureMix. By the way, this video shows color coding of tracks. You can also do this in Reaper, which I show you how to do in my article here: Color Coding Tracks To Organize Your Mix
